How Do You Trim a Greyhound’s Nails?
Greyhound Nail Trimming Guide
Understand the Importance of Nail Trimming
Determining the Right Time to Trim Nails
Is it OK to Never Trim my Greyhounds Nails?
Essential Tools for Nail Trimming
Step-by-Step Nail Trimming Process
Greyhound Nail Trimming Guide
Proper nail care is essential for the overall health and well-being of your Greyhound. Regular nail trimming helps prevent discomfort, pain, and potential injuries. However, knowing when and how to trim your Greyhound’s nails can be a bit daunting. In this comprehensive guide, we will discuss when to trim your Greyhound’s nails, step-by-step instructions for trimming, and important precautions to keep in mind.

Understanding the Importance of Nail Trimming:
Long nails can cause discomfort and affect your Greyhound’s gait. Overgrown nails can also lead to painful conditions like nail splitting, ingrown nails, and even joint issues. Regular nail trimming ensures your Greyhound maintains proper posture, prevents injuries, and promotes healthy foot structure.
Determining the Right Time to Trim Nails:
The frequency of nail trims for Greyhounds can vary depending on factors such as activity level, nail growth rate, and walking surfaces. As a general guideline, inspect your Greyhound’s nails every 2-4 weeks. If you hear clicking sounds when your dog walks on a hard surface or if the nails are touching the ground when standing, it’s time for a trim.
Is it OK to Never Trim my Greyhounds Nails?
Long nails will hit the ground which will put force on your greyhound’s foot and leg structure. This force can potentially lead to ongoing pain or arthritis developing in your greyhound. If your greyhound is walking on hard concrete-like surfaces regularly their nails will wear down naturally and will need little care. But if your greyhound is on softer surfaces or has unusual nail wear, you may need to trim your greyhound’s nails. The pattern of growth of a greyhound’s nails forms a curved shape. If left long and untrimmed, the nails will eventually curve under your greyhound’s paw and dig into its skin which will cause pain when they walk.
Essential Tools for Nail Trimming:
Before you begin, gather the necessary tools for a successful nail-trimming session:
Clippers: Use either guillotine-style clippers or scissor-style clippers with a straight cutting edge. Ensure they are appropriate for the size of your Greyhound’s nails.
Styptic Powder: Have styptic powder or a styptic pencil on hand to stop bleeding in case of accidental nail cutting too close to the quick.
Treats: Prepare some treats or rewards to help keep your Greyhound calm and reward them for their cooperation.
Step-by-Step Nail Trimming Process:
Follow these steps to trim your Greyhound’s nails safely and effectively:
- Familiarise Your Greyhound
Before attempting to trim their nails, get your Greyhound accustomed to having their paws touched. Gently handle their paws, touch their nails, and reward them with treats and praise for positive behaviour.
- Identify the Quick
The quick is the pink area within the nail that contains blood vessels and nerves. It’s essential to avoid cutting into the quick as it can cause bleeding and pain. Ideally, it is best to not cut within 2 millimetres of the quick. In dogs with clear or light-coloured nails, the quick is more visible, while in dogs with dark nails, it may be harder to identify. Proceed with caution.
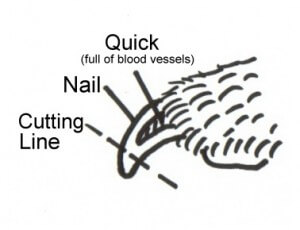
- Make Gradual Trims
Position the clippers perpendicular to the nail, just above the quick. Make small, gradual cuts, avoiding any sudden movements that may startle your Greyhound. Trim a small amount at a time, periodically checking the cut surface to ensure you’re not nearing the quick.
- Monitor the Sound and Texture
Listen for a solid “snip” sound while cutting the nails. If you hear a “click” or the nails feel rough or uneven, additional trimming is necessary. Aim to create a smooth, rounded edge.
- Address Dewclaws
Don’t forget to trim the Dewclaws if your Greyhound has them. These are the nails higher up on the leg and may require additional attention.
- Take It Slow
Patience is key. If you or your Greyhound become anxious or stressed, take breaks, offer reassurance, and resume when both of you are calm.
- Avoid Over Trimming
Trim a little at a time to avoid cutting into the quick. It’s better to make multiple small trims than risk injuring your Greyhound.
- Have Styptic Powder Ready
Accidental cuts into the quick can happen. Apply styptic powder or use a styptic pencil to stop bleeding if it occurs. Apply gentle pressure for a few seconds.
- Seek Professional Help (if needed)
If you’re uncomfortable trimming your Greyhound’s nails or if your dog becomes too anxious, seek assistance from a professional groomer or a veterinarian who can help you safely trim the nails.
Regular nail trims are essential for maintaining your Greyhound’s comfort and overall health. By following the guidelines outlined in this article, you can confidently trim your Greyhound’s nails, ensuring they are at an appropriate length and promoting their well-being. Remember to approach nail trimming with patience, be mindful of the quick, and seek professional assistance if needed.